First AJAX application using JSP
The keystone of AJAX is the XMLHttpRequest object. Different browsers use different methods to create the XMLHttpRequest object. Internet Explorer uses an ActiveXObject, while other browsers use the built-in JavaScript object called XMLHttpRequest. Now to understand how AJAX works, we will create a simple AJAX application.
First, we will create a standard HTML form with two text fields: username and date. The username field will be filled in by the user and at the same time the date field will be filled in automatically using AJAX. Then we will create XMLHttpRequest object, and to deal with different browsers, a “try and catch” statement will be used.
The HTML file with the JavaScript that creates the XMLHttpRequest object will be named “testAjax.html“. It looks like this (notice that the HTML form below has no submit button). See the code below:
<html>
<head>
    <script type="text/javascript">
        function ajaxFunction() {

            var xmlHttp;
            var url = "date.jsp";

            try {
                //Firefox, Chrome, IE7+, Safari, Opera
                xmlHttp = new XMLHttpRequest();
            }
            catch (e) {
                try {
                    //Old versions of IE (versions 5 and 6) use an ActiveX object
                    xmlHttp = new ActiveXObject("Microsoft.XMLHTTP");

                } catch (e) {
                    alert("Your browser does not support AJAX!");
                    return false;
                }
            }

            xmlHttp.onreadystatechange = function () {
                if (xmlHttp.readyState == 4) {
                    document.myForm.date.value = xmlHttp.responseText;
                }
            }
            xmlHttp.open("GET", url, true);
            xmlHttp.send(null);
        }
    </script>
</head>
<body>
    <center>
        <br><br><br>
        <form name="myForm">
            Name: <input type="text" onkeyup="ajaxFunction();" name="username" />
            Date: <input type="text" name="date" size="30"/>
        </form>
    </center>
</body>
</html>
Explaining the XMLHttpRequest object in the code
Before sending data to the server, we have to explain three important properties of the XMLHttpRequest object.
The onreadystatechange property:
After sending a request to the server, we need a function that can receive the data that is returned by the server. The onreadystatechange property stores our function that will process the response from a server. This is not a method; the function is stored in the property to be called automatically. The following code sets the onreadystatechange property and stores an empty function inside it:
xmlHttp.onreadystatechange=function() {
   // We are going to write some code here
}
The readyState Property:
The readyState property holds the status of the server’s response. Each time the readyState changes, the onreadystatechange function will be executed.
Here are the possible values for the readyState property:
State | Description |
0 | The request is not initialized |
1 | The request has been set up |
2 | The request has been sent |
3 | The request is in process |
4 | The request is complete |
We are going to add an if statement to the onreadystatechange function to test if our response is complete (this means that we can get our data):
xmlHttp.onreadystatechange=function(){
    if(xmlHttp.readyState==4)  {
       // Get the data from the server's response
    }
}
The responseText Property:
The data sent back from the server can be retrieved with the responseText property. In our code, we will set the value of our “time” input field equal to responseText:
xmlHttp.onreadystatechange=function(){
    if(xmlHttp.readyState==4)  {
         document.myForm.time.value = xmlHttp.responseText;
    }
}Sending a Request to the Server
To send off a request to the server, we use the open() method and the send() method. The open() method takes three arguments. The first argument defines which method to use when sending the request (GET or POST). The second argument specifies the URL of the server-side script. The third argument specifies that the request should be handled asynchronously. The send() method sends the request off to the server. If we assume that the HTML and JSP file are in the same directory, the code would be:
xmlHttp.open("GET","date.jsp",true);
xmlHttp.send(null);
Now we must decide when the AJAX function should be executed. We will let the function run “behind the scenes” when the user types something in the username text field:
<form name="myForm">
   Name: <input type="text"onkeyup="ajaxFunction();" name="username" />
   Time: <input type="text" name="date" size="30"/>
</form>
AJAX – The Server-Side JSP code
Now we are going to create the script that displays the current server time. The responseText property (explained in the previous chapter) will store the data returned from the server. Here we want to send back the current time. The code in “date.jsp” looks like this:
<%
  java.util.Date d = new java.util.Date();
  response.setContentType("text/html");
  response.setHeader("Cache-Control", "no-cache");
  out.println(d);
%>
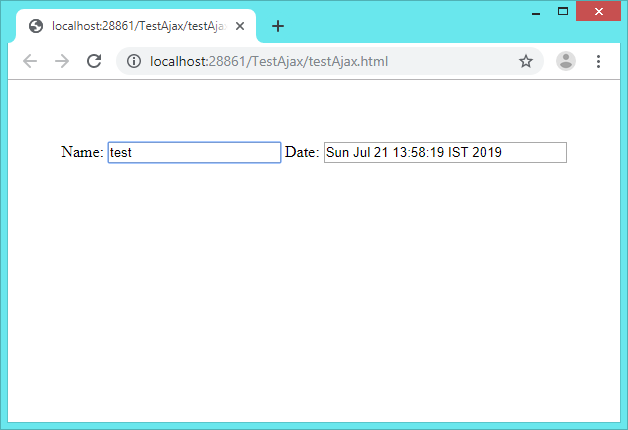
Run the AJAX Application
Try the AJAX application (testAjax.html) by typing some text into the Name text box below. The Date text box gets the server’s date from “date.jsp” file without reloading the page!
In the next section, we write another application using AJAX with JSP in the server side.