Creating and Using a Package
In this tutorial, we will learn how to create a user-defined package with some classes in it and then use these classes for program development.
Suppose we have a file called A.java, and we want to put the compiled class file (A.class) in a package named techguru under “C:\test” directory. First thing we have to do is to specify the keyword package with the name of the package we want to use (techguru in our case) on top of our source file, before the code that defines the real classes in the package, as shown in our A class below. This class is having a method named name().
A.java
package techguru;

public class A {

    public void name() {
	System.out.println("Name = Tech Guru");
    }

}
Similarly, we create two more programs named B.java and C.java with a single method for each of them. The class B contains address() method and class C contains phone() method.
B.java
package techguru;

public class B {

    public void address() {
	System.out.println("Address = New Delhi");
    }

}
C.java
package techguru;

public class C {

    public void phone() {
	System.out.println("Phone = 9830598305");
    }

}
NOTE: The statement “package techguru” in each of these three programs denotes that all the Java class files are to be placed into “\techguru” sub-directory under the “C:\test” directory.
Finally, we create the main program named Main.java. It does have the main() method as well unlike classes A, B and C.
Though, the package statement in this program is different from the other programs. Here, the package name is techguru.example.
Now, from the Main class we are going to create objects of the classes A, B and C. We also create the subclass (named X) of class A in this program. See it below.
Main.java
package techguru.example;

import techguru.A;
import techguru.B;
import techguru.C;

//X is subclass of A
class X extends A {

    public void job() {
	System.out.println("Job = Author");
    }
}

public class Main {

    public static void main(String[] s)  {

	X x = new X();
	B b = new B();
	C c = new C();

	x.name();
	x.job();
	b.address();
	c.phone();

    }

}
NOTE: The statement “package techguru.example” in Main.java program denotes that all the Java class files are to be placed into “\techguru\example” sub-directory under the “C:\test” directory.
As mentioned before, these four Java programs reside in the C:\test directory under MS Windows. See the directory structure below.
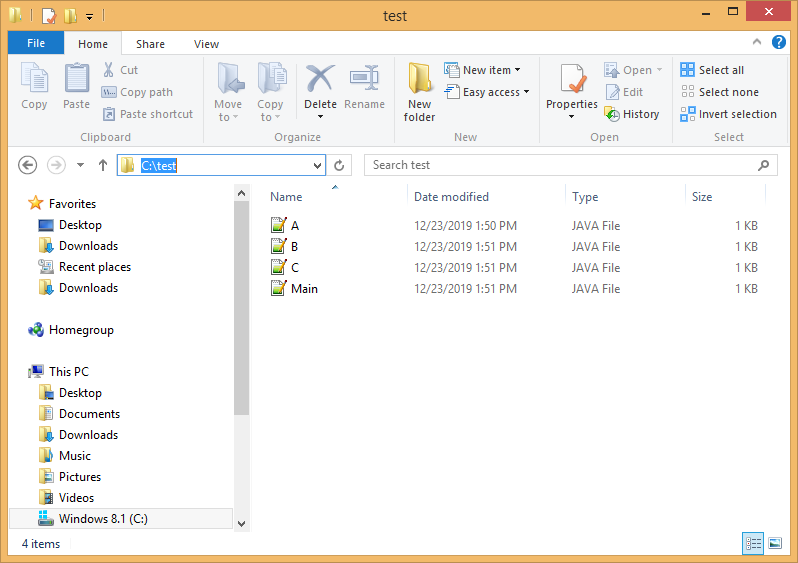
Figure 1: Directory Structure of C:\test
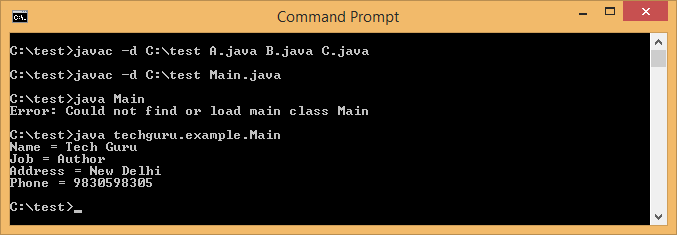
NOTE: Whenever we are using the statement package techguru in our Java program, the class file corresponding to the Java program will be placed into the teghguru sub-directory under the present working directory (C:\test) . Here, we have to use “javac –d directory_hierarchy code_name” command instead of using the conventional “javac” command in order to place the compiled Java class files into the sub-directory techguru which is to be created during compile time. The command is given below.
C:\test>javac -d C:\test A.java B.java C.java
In order to compile and run them using Java Package concept we have to perform the following steps in a command prompt window below. It is to be noted that to run the main program we have to use the fully-qualified class name (techguru.example.Main), otherwise the program will result in runtime error.
Setting CLASSPATH Option
Setting the CLASSPATH option enables us to provide where to find user class files during compile/run time whereas “javac –d” command helps us specifying where to place the generated class files during compilation.
This concept is particularly useful whenever we change our present working directory using “cd” command. Otherwise, trying to run the main program will result in runtime error. Here, we must use the CLASSPATH option. See it below.
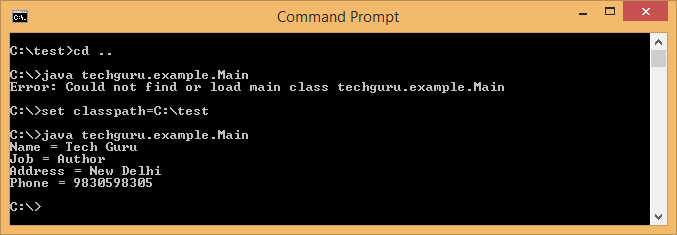
NOTE: Let us consider that we have set the CLASSPATH as follows-
C:\>set classpath=.;C:\test;Here, we set the CLASSPATH to point to two places, . (dot) and C:\test directory. We are very much familiar with . (dot) and .. (dot dot) in DOS or UNIX/LINUX. We use . as an alias for the current directory and .. for the parent directory.
In our CLASSPATH we include this . for convenient reason. Java will find our class file not only from C:\test directory but from the current directory as well. Also, we use ; (semicolon) to separate the directory location in case we keep class files in many places.
In UNIX/LINUX, we can set the CLASSPATH option as follows-
export CLASSPATH=/home/test;