Java Native Interface (JNI)
The Java Native Interface or JNI is an application programming framework that allows Java code running in a Java Virtual Machine (JVM) to call native applications (programs specific to a hardware and operating system platform) and libraries written in other languages, such as C and C++.
JNI allows one to write native methods to handle situations when an application cannot be written entirely in the Java programming language e.g. when the standard Java class library does not support the platform-specific features or program library. It is also used to modify an existing application, written in another programming language, to be accessible to Java applications. Many of the standard library classes depend on JNI to provide functionality to the developer and the user, e.g. I/O file reading and sound capabilities.
Including performance and platform-sensitive API implementations in the standard library allows all Java applications to access this functionality in a safe and platform-independent manner. Before resorting to using JNI, developers should make sure the functionality is not already provided in the standard libraries.
The JNI framework lets a native method utilize Java objects in the same way that Java code uses these objects. A native method can create Java objects and then inspect and use these objects to perform its tasks. A native method can also inspect and use objects created by Java application code.
JNI is sometimes referred to as the “escape hatch” for Java developers because it allows them to add functionality to their Java application that the standard Java APIs cannot otherwise provide. It can be used to interface with code written in other languages, such as C and C++. It is also used for time-critical calculations or operations like solving complicated mathematical equations, since native code can be faster than JVM code.
Tools and Components
JNI is a native programming interface that is part of the Java’s Software Development Kit (SDK). To run the programming examples in this tutorial, we will need the following tools and components:
♦ Java compiler: javac.exe ships with the SDK.
♦ Java virtual machine (JVM): java.exe ships with the SDK.
♦ Native method C file generator: javah.exe ships with the SDK.
♦ Library files and native header files: They define JNI. The jni.h C header file, jvm.lib, and jvm.dll or jvm.so files all ship with the SDK.
♦ C and C++ compiler: They can create a shared library. The two most common C/C++ compilers are Cygwin & MinGW. I use here MinGW 64-bit version (MinGW-w64) which is available from the software named Dev-C++ installed in my MS Windows PC.
Although we may use any development environment we like, the examples we’ll work with in this tutorial were written using the standard tools and components that ship with the SDK. This chapter specifically addresses Oracle’s implementation of JNI, which should be regarded as the standard for JNI solutions. The details of other JNI implementations are not addressed here.
Steps to call C functions from Java code
The process of calling C functions from Java programs consists of five steps. We’ll go over each step in depth in the sections that follow, but let’s start with a quick look at each one.
1. Write the Java code. We’ll start by writing Java classes to perform three tasks: declare the native method we’ll be calling; load the shared library containing the native code; and call the native method.
2. Compile the Java code and create the C header file. We must successfully compile the Java code to bytecode before we can use them. During compilation, the C header file will be created. It will declare the native function signature that we want to call. This header will then be used with the C function implementation (see Step 3) to create the shared library (see Step 4).
3. Write the C code. This step consists of implementing the function in a C source code file. The C source file must include the header file we created in Step 2.
4. Create the shared library file. We’ll create a shared library file from the C source code file we created in Step 3.
5. Run the Java program. We’ll run the code and see if it works. We’ll also go over some tips for dealing with the more commonly occurring errors.
Step 1: Write the Java code
We’ll start by writing the Java source code file, which will declare the native method (or methods), load the shared library containing the native code, and actually call the native method.
Here’s our example Java source code file, called SampleJNI.java:
SampleJNI.java
public class SampleJNI {
    public native int intMethod(int n);
    public native boolean booleanMethod(boolean bool);
    public native String stringMethod(String text);
    public native int intArrayMethod(int[] intArray);

    public static void main(String[] args) {
	System.loadLibrary("SampleJNI");
	SampleJNI sample = new SampleJNI();
	int     square = sample.intMethod(5);
	boolean bool   = sample.booleanMethod(true);
	String  text   = sample.stringMethod("JAVA");
	int     sum    = sample.intArrayMethod(new int[]{1,1,2,3,5,8,13});

	System.out.println("intMethod: " + square);
	System.out.println("booleanMethod: " + bool);
	System.out.println("stringMethod: " + text);
	System.out.println("intArrayMethod: " + sum);
   }
}
First of all, note the use of the native keyword, which can be used only with methods. The native keyword tells the Java compiler that a method is implemented in native code outside of the Java class in which it is being declared. Native methods can only be declared in Java classes, not implemented, so a native method cannot have a body.
Now, let’s look at the code line by line:
- In lines 2 through 5 we declare four native methods.
- On line 8 we load the shared library file containing the implementation for these native methods. (We’ll create the shared library file when we come to Step 5.)
Finally, in lines 10 through 13 we call the native methods. Note that this operation is no different from the operation of calling non-native Java methods.
Step 2: Compile the Java code and create C/C++ header file
Next, we need to compile the Java code down to bytecode. One way to do this is to use the Java compiler, javac, which comes with the SDK. The command we use to compile our Java code to bytecode is:
javac -h . SampleJNI.java
This step will also to create a C header file that defines native function signatures. One way to do this is to use the native method C stub generator tool, javah.exe, which comes with the SDK. This tool is designed to create a header file that defines C-style functions for each native method it finds in a Java source code file.
Results of running javah.exe on SampleJNI.java
SampleJNI.h, below, is the C header file generated by running the javah tool on our Java code:
SampleJNI.h
/* DO NOT EDIT THIS FILE - it is machine generated */
#include <jni.h>
/* Header for class SampleJNI */

#ifndef _Included_SampleJNI
#define _Included_SampleJNI
#ifdef __cplusplus
extern "C" {
#endif
/*
 * Class:     SampleJNI
 * Method:    intMethod
 * Signature: (I)I
 */
JNIEXPORT jint JNICALL Java_SampleJNI_intMethod
  (JNIEnv *, jobject, jint);

/*
 * Class:     SampleJNI
 * Method:    booleanMethod
 * Signature: (Z)Z
 */
JNIEXPORT jboolean JNICALL Java_SampleJNI_booleanMethod
  (JNIEnv *, jobject, jboolean);

/*
 * Class:     SampleJNI
 * Method:    stringMethod
 * Signature: (Ljava/lang/String;)Ljava/lang/String;
 */
JNIEXPORT jstring JNICALL Java_SampleJNI_stringMethod
  (JNIEnv *, jobject, jstring);

/*
 * Class:     SampleJNI
 * Method:    intArrayMethod
 * Signature: ([I)I
 */
JNIEXPORT jint JNICALL Java_SampleJNI_intArrayMethod
  (JNIEnv *, jobject, jintArray);

#ifdef __cplusplus
}
#endif
#endif
About the C header file
As we’ve probably noticed, the C function signatures in SampleJNI.h are quite different from the Java native method declarations in SampleJNI.java. JNIEXPORT and JNICALL are compiler-dependent specifiers for export functions. The return types are C types that map to Java types. The parameter lists of all these functions have a pointer to a JNIEnv and a jobject, in addition to normal parameters in the Java declaration. The pointer to JNIEnv is in fact a pointer to a table of function pointers. As we’ll see in Step 4, these functions provide the various faculties to manipulate Java data in C. The jobject parameter refers to the current object. Thus, if the C code needs to refer back to the Java side, this jobject acts as a reference, or pointer, back to the calling Java object. The function name itself is made by the “Java_” prefix, followed by the fully qualified class name, followed by an underscore and the method name. |
Step 3: Write the C code
When it comes to writing the C/C++ function implementation, the important thing to keep in mind is that our signatures must be exactly like the function declarations from Sample1.h. We’ll look at the complete code for a C implementation implementation.
The C function implementation
Here is SampleJNI.c, an implementation written in C:
SampleJNI.c
#include "SampleJNI.h"
#include <string.h>

JNIEXPORT jint JNICALL Java_SampleJNI_intMethod
   (JNIEnv *env, jobject obj, jint num) {
    return num * num;
}

JNIEXPORT jboolean JNICALL Java_SampleJNI_booleanMethod
   (JNIEnv *env, jobject obj, jboolean boolean) {
   return !boolean;
}

JNIEXPORT jstring JNICALL Java_SampleJNI_stringMethod
   (JNIEnv *env, jobject obj, jstring string) {
     const char *str = (*env)->GetStringUTFChars(env, string, 0);
    char cap[128];
    strcpy(cap, str);
    (*env)->ReleaseStringUTFChars(env, string, str);
     return (*env)->NewStringUTF(env, strupr(cap));
}

JNIEXPORT jint JNICALL Java_SampleJNI_intArrayMethod
  (JNIEnv *env, jobject obj, jintArray array) {
    int i, sum = 0;
    jsize len = (*env)->GetArrayLength(env, array);
    jint *body = (*env)->GetIntArrayElements(env, array, 0);
    for (i=0; i<len; i++) {
        sum += body[i];
    }
    (*env)->ReleaseIntArrayElements(env, array, body, 0);
    return sum;
}

void main(){}
Step 4: Create the shared library file
Next, we create a shared library file that contains the native code. Most C and C++ compilers can create shared library files in addition to machine code executables. The command we use to create the shared library file depends on the compiler we’re using. Below are the commands that will work on MS Windows systems.
x86_64-w64-mingw32-gcc -I"C:\Program Files\Java\jdk1.8.0_162\include" -I"C:\Program Files\Java\jdk1.8.0_162\include\win32" -shared -o SampleJNI.dll SampleJNI.c
Step 5: Run the Java program
The last step is to run the Java program and make sure that the code works correctly. Because all Java code must be executed in a Java virtual machine, we need to use a Java runtime environment. One way to do this is to use the Java interpreter, java, which comes with the SDK. The command to use is:
java SampleJNI
When we run the SampleJNI.class program, we should get the following result:
intMethod: 25
booleanMethod: false
stringMethod: JAVA
intArrayMethod: 33
How the JNI works
In the JNI framework, native functions are implemented in separate .c or .cpp files. When the JVM invokes the function, it passes a JNIEnv pointer, a jobject pointer, and any Java arguments declared by the Java method. A JNI function may look like this:
JNIEXPORT void JNICALL Java_ClassName_MethodName (JNIEnv *env, jobject obj) {
    /*Implement Native Method Here*/
}
The env pointer is a structure that contains the interface to the JVM. It includes all of the functions necessary to interact with the JVM and to work with Java objects. Example JNI functions are converting native arrays to/from Java arrays, converting native strings to/from Java strings, instantiating objects, throwing exceptions, etc. Basically, anything that Java code can do, can be done using JNIEnv, albeit with considerably less ease.
For example, the following converts a Java string to a native string:
/* C code */
JNIEXPORT void JNICALL Java_ClassName_MethodName (JNIEnv *env, jobject obj, jstring javaString) {

    /*Get the native string from javaString*/
    const char *nativeString = (*env)->GetStringUTFChars(env, javaString, 0);  /*Do something with the nativeString*/

    /*DON'T FORGET THIS LINE!!!*/
    (*env)->ReleaseStringUTFChars(env, javaString, nativeString);
}
Native data types can be mapped to/from Java data types. For compound types such as objects, arrays and strings the native code must explicitly convert the data by calling methods in the JNIEnv.
Mapping types
The following table shows the mapping of types between Java and native code.
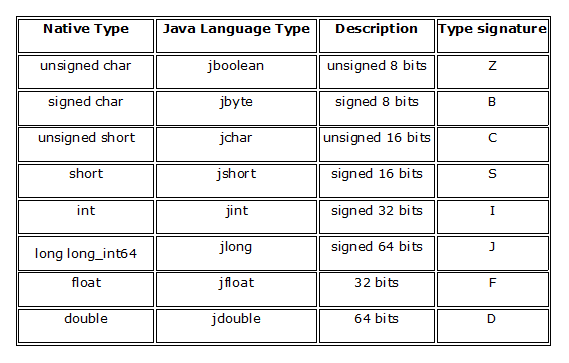
In addition, the signature “L fully-qualified-class ;” would mean the class uniquely specified by that name; e.g., the signature “Ljava/lang/String;” refers to the class java.lang.String. Also, prefixing [to the signature makes the array of that type; for example, I means the int array type.
Here, these types are interchangeable. We can use jint where we normally use an int, and vice-versa, without any typecasting required.