Building Web Applications with Spring Web MVC
The Spring Framework is a popular open source application framework that can make JEE development easier. It consists of a container, a framework for managing components, and a set of snap-in services for web user interfaces, transactions, and persistence. A part of the Spring Framework is Spring Web MVC, an extensible MVC framework for creating web applications.
This part of this chapter shows us how to construct a simple web MVC application using the Spring Framework in NetBeans IDE 8.2. The application enables a user to enter his/her name in a text field, and upon clicking OK, the name is returned and displayed on a second page with a welcome greeting.
The IDE provides built-in support for Spring Framework 2.5. Framework libraries are packaged with the IDE and are automatically added to the project classpath when the framework is selected. Configuration settings are provided, such as naming and mapping of the Spring Web MVC DispatcherServlet. The JSTL library is automatically registered. Support for Spring XML bean configuration files is also provided, including the following functionalities:
- Code completion. Invoked in Spring XML configuration files for Java classes as well as bean references.
- Navigation. Hyper linking of Java classes and properties mentioned in Spring bean definitions, as well as hyper linking to other Spring bean references.
- Refactoring. Renaming of references to Java classes in Spring XML configuration files.
The Web and Java EE installation enables us to optionally install the GlassFish application server and the Apache Tomcat web container. We must install one of these (or register a different server in the IDE) to work through this topic.
Softwares Used
To complete this topic, we will need the following software resources :—
- NetBeans IDE 8.2
- Java Development Kit (JDK) 8
- GlassFish server 4.1.1
Building a Spring Web MVC Application
In the IDE, we create here a Spring application in the same way as we create any other web application in the IDE – using the New Web Application wizard, with the additional step of indicating that we want the Spring libraries and configuration files to be included in our web application.
We start here by creating a new project for a web application using the Spring Framework.
- Choose New Project (Ctrl-Shift-N) from the IDE’s File menu. Select the Java Web category, then under Projects select Web Application. Click Next.
- In Project Name, type in HelloSpring. Click Next.
- In Step 3: Server and Settings, deselect the Enable Contexts and Dependency Injection option, as we are not working with the JSR-299 specification in this tutorial.
- Confirm that the GlassFish server is selected in the Server drop-down list. Click Next.
The Java EE version depends upon the version of the server that is selected. The default Java EE version is Java EE 7 Web when the selected server is GlassFish Server 4.0.
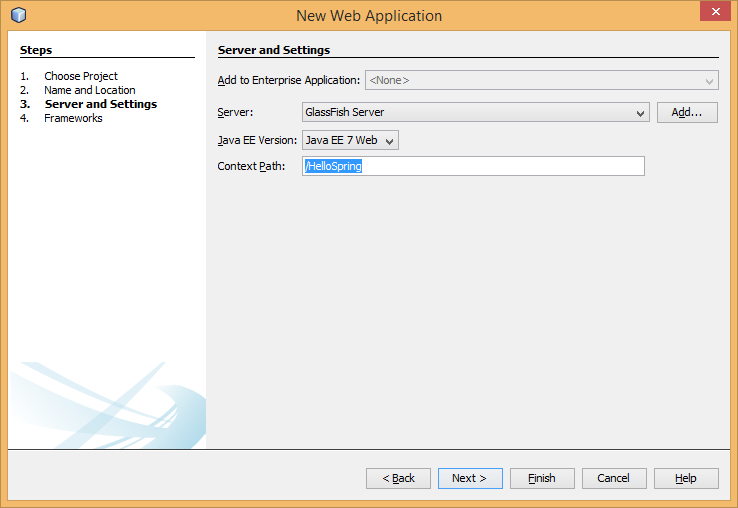
- In Step 4, the Frameworks panel, select Spring Web MVC.
- Select Spring Framework 3.x in the Spring Library drop-down list.

Note: The IDE enables us to add the Spring 4.x library to our project, but for this tutorial we will use SimpleFormController that is not supported in Spring 4.x. Also, when we select Spring Web MVC, note that the JSTL (JavaServer Pages Standard Tag Library) library is added to the classpath during project creation by default. Deselect this option (as in the above screenshot), since we do not require JSTL for this tutorial.
- Click the Configuration tab and note that the wizard enables us to specify the name and mapping of the Spring Dispatcher servlet.

- Click Finish. The IDE creates a project for the entire application, including all metadata, as well as the project’s Ant build script which we can inspect from the Files window (Ctrl-2). We can view the template structure from the Projects window (Ctrl-1). Also note that four files open by default in the IDE’s editor:
dispatcher-servlet.xml,applicationContext.xml,redirect.jsp, andindex.jsp. - In the Projects window, expand the new project’s Libraries node and note that the Spring JARs are included in the project’s classpath.

Running the Skeleton Project
Before making any changes to project files, try running the new project in the IDE:
Click the Run Project (  ) in the IDE’s main toolbar. The IDE automatically starts the GlassFish server if it is not already running, compiles the project, then deploys it to the server. Note any output displayed in the IDE’s Output window (Ctrl-4). The generated output completes with a
 BUILD SUCCESSFUL message. The IDE’s default browser starts up, and we may see content from the welcome page view (/WEB-INF/jsp/index.jsp).
When we run our project in the IDE, the project is compiled and deployed to the server, and then opens in our default browser. Furthermore, the IDE provides a Deploy on Save feature, which is activated by default for web projects. When we save files in the editor, our project is automatically recompiled and deployed to the server. To view changes, we can simply refresh pages in our browser.
In order to understand what just took place, start by examining the project’s deployment descriptor (web.xml). To open this file in the Source Editor, right-click the WEB-INF > web.xml node in the Projects window and choose Edit. The default entry point for the application is redirect.jsp:
<welcome-file-list>
    <welcome-file>redirect.jsp</welcome-file>
</welcome-file-list>
Within redirect.jsp, there is a redirect statement that points all requests to index.htm:
<% response.sendRedirect("index.htm"); %>In the deployment descriptor, note that all requests for URL patterns that match *.htm are mapped to Spring’s DispatcherServlet.
<servlet>
    <servlet-name>dispatcher</servlet-name>
    <servlet-class>org.springframework.web.servlet.DispatcherServlet</servlet-class>
    <load-on-startup>2</load-on-startup>
</servlet>

<servlet-mapping>
    <servlet-name>dispatcher</servlet-name>
    <url-pattern>*.htm</url-pattern>
</servlet-mapping>
The fully qualified name of the dispatcher servlet, as shown above, is org.springframework.web.servlet.DispatcherServlet. This class is contained in the Spring library, which was added to the project classpath when the project was created. We can verify this in the Projects window by drilling down from the Libraries node. Locate the spring-webmvc-3.1.1.RELEASE.jar, then expand it to find org.springframework.web.servlet > DispatcherServlet.
The DispatcherServlet handles incoming requests based on configuration settings found in dispatcher-servlet.xml. Open dispatcher-servlet.xml by clicking on its tab in the editor. Note the following code.
<bean id="urlMapping" class="org.springframework.web.servlet.handler.SimpleUrlHandlerMapping">
    <property name="mappings">
        <props>
            <prop key="/index.htm">indexController</prop>
        </props>
    </property>
</bean>

<bean id="viewResolver"
      class="org.springframework.web.servlet.view.InternalResourceViewResolver"
      p:prefix="/WEB-INF/jsp/"
      p:suffix=".jsp" />

<bean name="indexController"
      class="org.springframework.web.servlet.mvc.ParameterizableViewController"
      p:viewName="index" />
Three beans are defined in this file: indexController, viewResolver, and urlMapping. When the DispatcherServlet receives a request that matches *.htm such as index.htm, it looks for a controller within urlMapping that can accommodate the request. Above, we see that there is a mappings property that links /index.htm to indexController.
The runtime environment then searches for the definition of a bean named indexController, which is conveniently provided by the skeleton project. Note that indexController extends ParameterizableViewController. This is another class provided by Spring, which simply returns a view. Above, note that p:viewName="index" specifies the logical view name, which is resolved using the viewResolver by prepending /WEB-INF/jsp/ and appending .jsp to it. This allows the runtime to locate the file within the application directory, and respond with the welcome page view (/WEB-INF/jsp/index.jsp).
Overview of the Application
The application we create is comprised of two JSP pages (which can be referred to as views in MVC terminology). The first view contains an HTML form with an input field asking for the user’s name. The second view is a page that simply displays a hello message containing the user’s name.
The views are managed by a controller, which receives requests to the application and decides which views to return. It also passes to the views any information that they need to display (this is called a model). This application’s controller is named HelloController.
In a complex web application, the business logic is not contained directly in the controller. Instead, another entity, named a service, is used by the controller whenever it needs to perform some business logic. In our application, the business logic is limited to the act of processing the hello message, and for this purpose we create a HelloService.
Implementing a Service
Now that we are sure that our environment is set up properly, we can begin extending the skeleton project according to our needs. Start by creating the HelloService class.
- Click the New File (
 ) button in the IDE’s toolbar. (Alternatively, press Ctrl-N; )
 - Select the Java category, then select Java Class and click Next.
- In the New Java Class wizard that displays, type in HelloService for Class Name, and enter service for Package Name to create a new package for the class.
- Click Finish. The IDE creates the new class and opens it in the editor.
The HelloService class performs a very simple service. It takes a name as a parameter, and prepares and returns a String that includes the name. In the editor, create the following sayHello() method for the class (changes in bold).
public class HelloService {

    public static String sayHello(String name) {
        return "Hello " + name + "!";
    }
}
Implementing the Controller and Model
We can use a SimpleFormController to handle user data and determine which view to return.
Note: SimpleFormController is deprecated in Spring 3.x. It is used in this tutorial for demonstration purposes. However, annotated controllers should be used instead of XML files.
- Open the New File wizard by pressing Ctrl-N. Under Categories select Spring Framework; under File Types select Simple Form Controller.

NetBeans IDE provides templates for various Spring artifacts, including the Spring XML Configuration File, theAbstractController, and theSimpleFormController. - Click Next.
- Name the class HelloController and create a new package for it by typing controller in the Package text field. Click Finish. The IDE creates the new class and opens it in the editor.
- Specify controller properties by uncommenting the setter methods that display by default in the class template. To uncomment the code snippet, highlight the code as in the image below, then press Ctrl-/ (⌘-/ on Mac).

Pressing Ctrl toggles comments in the editor. - Make changes as follows (shown in bold).
public HelloController() {
    setCommandClass(Name.class);
    setCommandName("name");
    setSuccessView("helloView");
    setFormView("nameView");
}
Setting the
FormViewenables us to set the name of the view that is used to display the form. This is the page that contains the text field allowing users to enter their name. Setting theSuccessViewlikewise lets us set the name of the view that should display upon a successful submit. When we set theCommandNamewe define the name of the command in the model. In this case, the command is the form object with request parameters bound onto it. Setting theCommandClassallows us set the name of the command class. An instance of this class gets populated and validated upon each request.Note that an error is flagged for
Namein thesetCommandClass()method:")
We now need to create the
Nameclass as a simple bean to hold information for each request. - In the Projects window, right-click on the project node and choose New > Java Class. The New Java Class wizard displays.
- Enter Name for the Class Name, and for Package select controller from the drop-down list.
- Click Finish. The
Nameclass is created and opens in the editor. - For the
Nameclass, create a field namedvalue, then create accessor methods (i.e., getter and setter methods) for this field. Start by declaring thevaluefield:public class Name { private String value; }To quickly type out ‘
private‘ we can type ‘pr‘ then press Tab. The ‘private‘ access modifier is automatically added to the line. This is an example of using the editor’s code templates. For a full list of code templates, choose Help > Keyboard Shortcuts Card.
The IDE can create accessor methods for us. In the editor, right-click onvalueand choose Insert Code (or press Alt-Insert; Ctrl-I on Mac). In the popup menu, choose Getter and Setter.
- In the dialog that displays, select the
value : Stringoption, then click OK. ThegetValue()andsetValue()methods are added to theNameclass:public String getValue() { return value; } public void setValue(String value) { this.value = value; } - Press Ctrl-Tab and choose
HelloControllerto switch back to theHelloControllerclass. Note that the previous error badge has disappeared since theNameclass now exists. - Delete the
doSubmitAction()method and uncomment theonSubmit()method. TheonSubmit()method enables us to create our ownModelAndView, which is what is required here. Make the following changes:@Override protected ModelAndView onSubmit( HttpServletRequest request, HttpServletResponse response, Object command, BindException errors) throws Exception { Name name = (Name) command; ModelAndView mv = new ModelAndView(getSuccessView()); mv.addObject("helloMessage", helloService.sayHello(name.getValue())); return mv; }As indicated above, thecommandis recast as aNameobject. An instance ofModelAndViewis created, and the success view is obtained using a getter inSimpleFormController. Finally, the model is populated with data. The only item in our model is the hello message obtained from theHelloServicecreated earlier. We use theaddObject()method to add the hello message to the model under the namehelloMessage. - Fix import errors by right-clicking in the editor and choosing Fix Imports (Ctrl-Shift-I).

Note. Confirm that org.springframework.validation.BindException and org.springframework.web.servlet.ModelAndView are selected in the Fix All Imports dialog box.
- Click OK. The following import statement is added to the top of the file:
import org.springframework.web.servlet.ModelAndView;
As stated in the API documentation, this class “represents a model and view returned by a handler, to be resolved by aDispatcherServlet. The view can take the form of aStringview name which will need to be resolved by aViewResolverobject; alternatively aViewobject can be specified directly. The model is aMap, allowing the use of multiple objects keyed by name.”
Note that at this stage, not all errors are fixed because the class still cannot identify theHelloServiceclass, nor make use of itssayHello()method. - Within
HelloController, declare a private field namedHelloService:private HelloService helloService;
Then create a public setter method for the field:public void setHelloService(HelloService helloService) { this.helloService = helloService; }Finally, right-click in the editor and choose Fix Imports (Ctrl-Shift-I; ⌘-Shift-I on Mac). The following statement is added to the top of the file:import service.HelloService;
All errors should now be fixed. - Register
HelloServiceinapplicationContext.xml. OpenapplicationContext.xmlin the editor and enter the following bean declaration:<bean name="helloService" class="service.HelloService" />
Spring support in the IDE includes code completion within XML configuration files for Java classes as well as bean references. To invoke code completion, press Ctrl-Space when working in the editor:
- Register
HelloControllerindispatcher-servlet.xml. Opendispatcher-servlet.xmlin the editor and enter the following bean declaration:<bean class="controller.HelloController" p:helloService-ref="helloService"/>
Implementing the Views
To implement the view for this project, we need to create two JSP pages. The first, which we will call nameView.jsp, serves as the welcome page and allows users to input a name. The other page, helloView.jsp, displays a greeting message that includes the input name. Begin by creating helloView.jsp.
- In the Projects window, right-click the WEB-INF >
jspnode and choose New > JSP. The New JSP File wizard opens. Name the file helloView. - Click Finish. The new JSP page is created in the
jspfolder and opens in the editor. - In the editor, change the file’s title to
Hello, and change the output message to retrieve thehelloMessageof theModelandViewobject that is created inHelloController.<head> <meta http-equiv="Content-Type" content="text/html; charset=UTF-8"> <title>Hello</title> </head> <body> <h1>${helloMessage}</h1> </body> - Create another JSP page in the same manner as above, but name it
nameView. - In the editor, add the following Spring tag library declaration to
nameView.jsp.<%@taglib uri="http://www.springframework.org/tags" prefix="spring" %>
This imports the Spring tag library, which contains tags useful when implementing views as JSP pages. - Change the contents of the
<title>and<h1>tags to read:Enter Your Name. - Enter the following code beneath the
<h1>tags:<spring:nestedPath path="name"> <form action="" method="post"> Name: <spring:bind path="value"> <input type="text" name="${status.expression}" value="${status.value}"> </spring:bind> <input type="submit" value="OK"> </form> </spring:nestedPath>spring:bind allows us to bind a bean property. The bind tag provides a bind status and value, which we use as the name and value of the input field. This way, when the form is submitted, Spring will know how to extract the submitted value. Here, our command class (controller.Name) has avalueproperty, therefore we set thepathtovalue.
spring:nestedPath enables us to prepend a specified path to a bean. So, when used withspring:bindas shown above, the path to the bean becomes:name.value. As we may recall, the command name ofHelloControllerisname. Therefore, this path refers to thevalueproperty of a bean namednamein the page scope. - Change the relative entry point for the application. Currently, the project entry point is still
index.htmwhich, as described in Running the Skeleton Project above, redirects toWEB-INF/jsp/index.jsp. We can specify an entry point for the project when it is deployed and run. In the Projects window, right-click the project node and choose Properties. The Project Properties dialog displays. Under Categories select Run. In the Relative URL field, type in/hello.htm, then click OK.
At this moment we may wonder where the mapping ofhello.htmtoHelloControlleris located. We have not added a mapping to theurlMappingbean, as is the case forindex.htm, the skeleton project’s welcome page. This is possible with a bit of Spring magic provided by the following bean definition indispatcher-servlet.xml:<bean class="org.springframework.web.servlet.mvc.support.ControllerClassNameHandlerMapping"/>
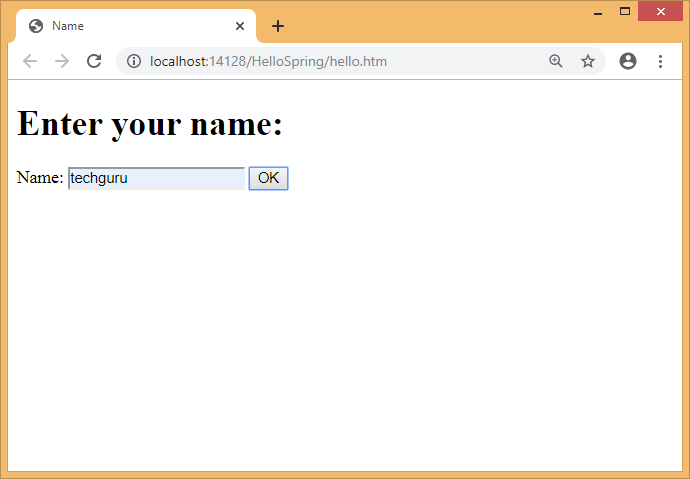
This bean is responsible for automatically creating an URL mapping for all controllers registered in the file. It takes the fully-qualified class name of the controller (in our case,controller.HelloController) and strips the package name andControllersuffix, then uses the result as a URL mapping. Therefore, forHelloControllerit creates ahello.htmmapping. This magic however does not work for controllers that are included in the Spring Framework, such asParameterizableViewController. They require an explicit mapping. - In the Projects window right-click the project node and choose Run. This compiles, deploys and runs the project. Our default browser opens, displaying
hello.htmas the project’snameView:
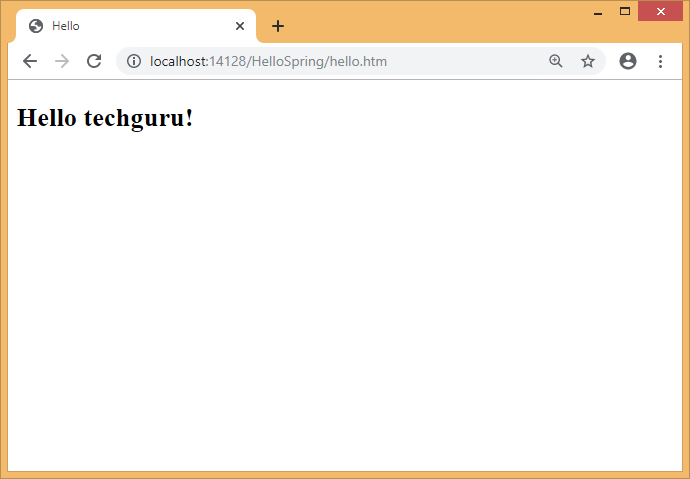
Enter your name in the text field and click enter. The helloView displays with a greeting message:
Note:
If the Spring application does not run for any XSD file version realted error in applicationContext.xml and dispatcher-servlet.xml, then use these names (without version number) in <beans> tag with “xsi:schemaLocation” attribute for “.xsd” files such as:
- spring-beans.xsd
- spring-aop.xsd
- spring-tx.xsd
Hopefully, this approach will solve the problem.
Conclusion
This concludes the Introduction to the Spring Framework in NetBeans IDE. This document demonstrated how to construct a simple web MVC application in the NetBeans IDE using the Spring Framework, and introduced us to the IDE’s interface for developing web applications.