Servlet Container
A number of servlet containers are available today. But the most popular one—and the one recognized as the official Servlet/JSP container—is Tomcat. Originally designed by Sun Microsystems (now owned by Oracle Corporation), Tomcat source code was handed over to the Apache Software Foundation in October 1999. In this new home, Tomcat was included as part of the Jakarta Project, one of the projects of the Apache Software Foundation. Working through the Apache process, Apache, Sun, and other companies—with the help of volunteer programmers worldwide—turned Tomcat into a world-class Servlet reference implementation. The current version of Tomcat is 8.5.37. Tomcat Version 8.5.37 implements the Servlet 3.1 and JSP 2.3 specifications.
Tomcat by itself is a web server which is written purely in Java. This means that we can use Tomcat to service HTTP requests for Servlets, as well as static files (HTML, image files, and so on). In practice, however, since it is faster for Servlet, JSP requests, Tomcat normally is used as a module with another more robust web server, such as Apache web server or Microsoft Internet Information Server. Only requests for Servlets or JSP pages are passed to Tomcat. Throughout this topic, Tomcat Version 8.5.37 is used as the Servlet/JSP container. This version implements the Servlet 3.1 and JSP 2.3 specifications. To write a Servlet on Tomcat 8.5.37, we need the Java Development Kit (JDK) version 1.7 or higher. Here, we have used JDK 1.8 version.
How to Install and Configure Tomcat
First we have to download the zip file named apache-tomcat-8.5.37.zip from http://tomcat.apache.org/. After downloading the zip file we have to extract it using some ZIP utility program (e.g. WinZip or 7-Zip) under the C:\ drive in MS Windows. In order to run Tomcat properly we have to create and set the value of JAVA_HOME System variable under Environment Variables (provided the PATH variable is already set to the bin directory of JAVA_HOME).
For MS Windows 8.1/10, we have to follow the options like this:
Control Panel -> System and Security -> System -> Advanced system settings -> System Properties (Advanced tab) -> Environment Variables -> New button
and set the values as shown below.
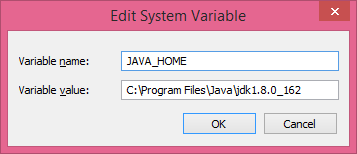
Figure 1: Configuration of JAVA_Home for Tomcat
After successful configuration, we can test whether it has been configured correctly or not using this from command prompt (cmd):
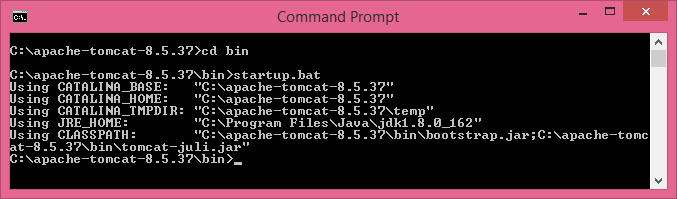
Figure 2: Testing for correct configuration of Tomcat Server
As a result the following new console will be opened to show that the Tomcat service is on:
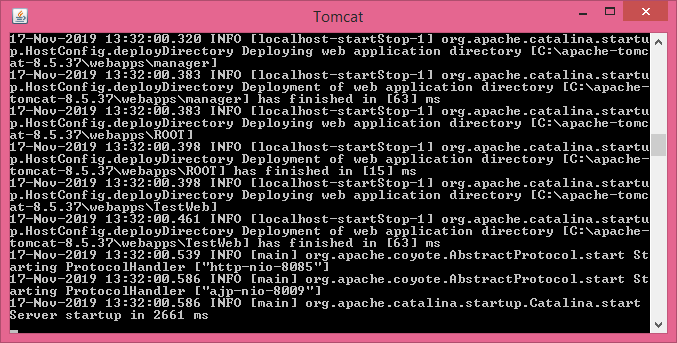
Figure 3: Successful running of Tomcat server
Now, we can test the successful running of Tomcat Server from a web browser. By default, Tomcat runs on port 8080 by default. But, here we have changed the port number to 8085 by modifying the following entries in the server.xml file under conf sub-directory of %CATALINA_HOME%. See it below:
<Connector port="8085" protocol="HTTP/1.1"
             connectionTimeout="20000"
             redirectPort="8443" />
If we run the web browser from the same computer as Tomcat, we can use the following URL:
http://localhost:8085
Typing the URL in the address bar of our web browser will give us the following output as shown below in Figure 4.
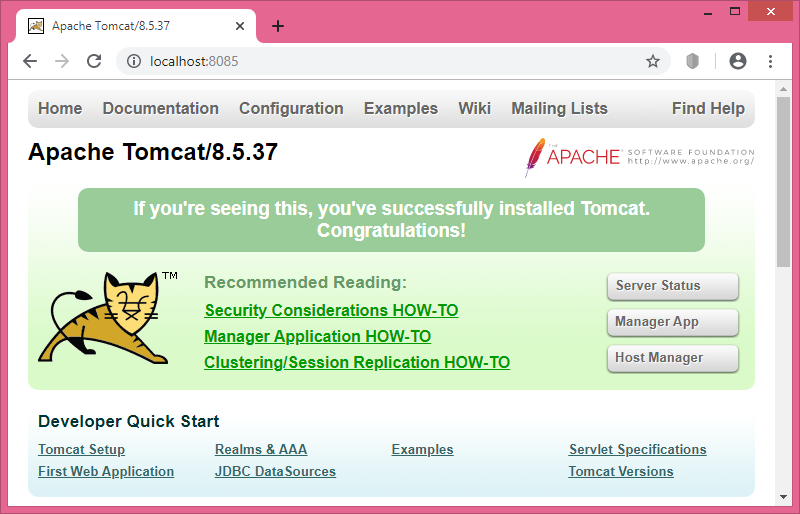
Figure 4: Successful running of Tomcat server
The above screen shows that everything goes fine !!