Steps to run a Servlet
After we have installed and configured Tomcat, we can put it into service. Basically, we need to follow six steps to go from writing our Servlet to running it. These steps are summarized as follows:
1. Create a directory structure under Tomcat for the application.
2. Write the servlet source code. We need to import the javax.servlet package and the javax.servlet.http package in our source file.
3. Compile the source code.
4. Create a deployment descriptor.
5. Run Tomcat.
6. Call the Servlet from a web browser.
The following sections will discuss each of these steps.
Step 1: Create a Directory Structure under Tomcat
The directory where Tomcat is installed is often referred to as %CATALINA_HOME%. When we install Tomcat, several sub-directories are automatically created under the Tomcat home directory (%CATALINA_HOME%). Throughout this book, %CATALINA_HOME% is C:\apache-tomcat-8.5.37 (in MS Windows). One of the sub-directories is “webapps“. The webapps directory is where we store our web applications. A web application is a collection of Servlets and other content installed under a specific subset of the server’s URL namespace. A separate directory is dedicated for each Servlet application. Therefore, the first thing to do when we build a Servlet application is to create an application directory. To create a directory structure for an application called TestWeb, we follow these steps:
(i) Create a directory called TestWeb under the webapps directory. The directory name is important because this also appears in the URL to our Servlet.
(ii) Create the src and WEB-INF directories under TestWeb, and create a directory named classes under WEB-INF. The directory structure is shown in Figure 1. The directory classes under WEB-INF are for our Java classes. If we have HTML files, let’s put them directly under the TestWeb directory. Here the src directory contains Servlet source codes.
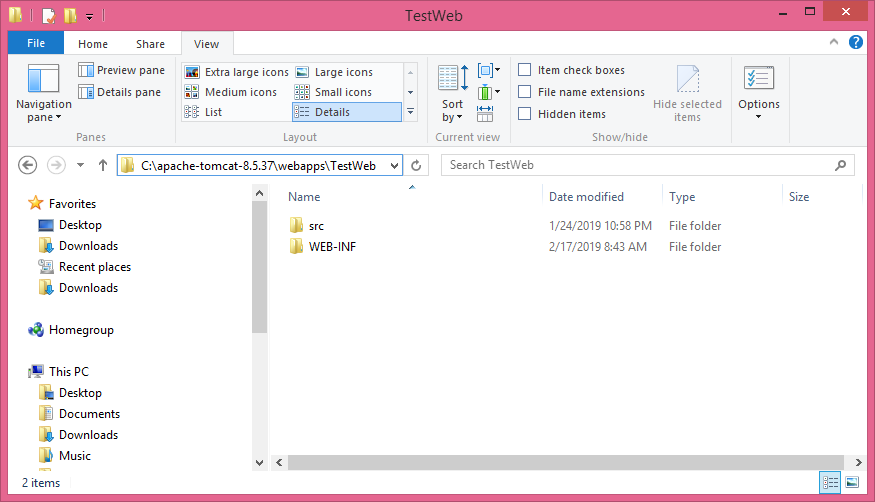
Figure 1: Tomcat application directory structure
It is to be noted that the examples, docs, examples, host-manager, manager, and ROOT directories are for applications that are created automatically when we install Tomcat.
Step 2: Write the Servlet Source Code
In this step, we prepare our source code. The code below describes a simple servlet called TestingServlet. The file is named TestingServlet.java. The Servlet sends a few HTML tags and some text to the browser. The example code is placed within TestWeb directory.
//TestingServlet.java
package com.example;

import javax.servlet.*;
import javax.servlet.http.*;
import java.io.*;
import java.util.*;

//user-defined servlet
public class TestingServlet extends HttpServlet {

  //user-defined method called by either doGet() or doPost()
  public void processRequest(HttpServletRequest request, HttpServletResponse response)
                           throws ServletException, IOException {

      PrintWriter out = response.getWriter();  //out is java.io.PrintWriter object for doing Networked I/O
      java.util.Date d = new java.util.Date(); //object of the class java.util.Date

      //Servlet embeds HTML tags within Java code using out.println()
      out.println("<html>");
      out.println("<head>");
      out.println("<title>Servlet Testing</title>");
      out.println("</head>");
      out.println("<body>");
      out.println("<center>");
      out.println("System date and time is: " + d);
      out.println("</center>");
      out.println("</body>");
      out.println("</html>");
  }

  //HTTP GET method for dealing with HTTP Request and HTTP Response
  public void doGet(HttpServletRequest request, HttpServletResponse response)
                  throws ServletException, IOException {
      processRequest(request, response);
  }

  //HTTP POST method for dealing with HTTP Request and HTTP Response
  public void doPost(HttpServletRequest request, HttpServletResponse response)
                   throws ServletException, IOException {
      processRequest(request, response);
  }

}
Now, let’s save our TestingServlet.java file to the “src” directory under TestWeb. But it is advisable to place the Servlet class files (after compilation) into the “WEB-INF/classes” sub-directory under TestWeb. Other files, such as HTML files and JSP files, should be placed directly under the TestWeb directory.
Step 3: Compile the Source Code
For our Servlet source code to compile, we need to include the path to the servlet-api.jar file in our classpath environment variable. The servlet-api.jar is located in the lib sub-directory under %CATALINA_HOME%. For example, if we placed Tomcat under the C:\ drive on MS Windows and we named the install directory as apache-tomcat-8.5.37, we have to type the following commands in the command prompt (cmd) from the directory where TestingServlet.java resides.
C:\set classpath=C:\apache-tomcat-8.5.37\lib\servlet-api.jar;

C:\apache-tomcat-8.5.37\webapps\TestWeb\src>javac -d  ..\WEB-INF\classes *.java
Step 4: Create the Deployment Descriptor
A Deployment Descriptor (DD) is an important component in a Servlet application. The descriptor takes the form of an XML document called web.xml and must be located in the WEB-INF directory of the Servlet application. When present, the deployment descriptor contains configuration settings specific to that application. To create the deployment descriptor, we now need to create a web.xml file and place it under the WEB-INF directory under TestWeb. The web.xml for this example application must have the following content.
<web-app>
   <servlet>
	<servlet-name>TestingServlet</servlet-name>
	<servlet-class>com.example.TestingServlet</servlet-class>
   </servlet>
   <servlet-mapping>
	<servlet-name>TestingServlet</servlet-name>
	<url-pattern>/test.do</url-pattern>
   </servlet-mapping>
</web-app>
The web.xml file has one element— <web-app>. We should write all our Servlets under <web-app>. For each servlet, we have a <servlet> element and a <servlet-mapping> element. The <servlet> element maps internal name to fully-qualified class name and <servlet-mapping> maps internal name to public URL name. Now for each <servlet> element, we need the <servlet-name> and <servlet-class> elements. The <servlet-name> is the internal name for our servlet, by which it is known to Tomcat. The <servlet-class> is the fully-qualified name of the Servlet class file. For each <servlet-mapping> element, we need the <servlet-name> and <url-pattern> elements. The <url-pattern> element denotes the public URL name.
Two important DD elements:
|
Step 5: Run Tomcat
If Tomcat is not already running, we need to start it as follows:
C:\apache-tomcat-8.5.37\bin>startup.batStep 6: Call the Servlet from a Web Browser
Now, we can call our servlet from a web browser. By default, Tomcat runs on port 8080 by default. But, here we have changed the port number to 8085 by modifying the following entries in the server.xml file under conf sub-directory of %CATALINA_HOME%. See it below:
<Connector port="8085" protocol="HTTP/1.1"
             connectionTimeout="20000"
             redirectPort="8443" />
The Servlet that we write in the preceding steps is named TestingServlet. The url_name is ‘/test.do’. The complete URL for that Servlet has the following format:
http://domain-name/virtual-directory/url_name
If we run the web browser from the same computer as Tomcat, we can replace the domain-name part with “localhost“. In that case, the URL for our servlet is
http://localhost:8085/TestWeb/test.doTyping the URL in the address bar of our web browser will give us the following output as shown below in Figure 2.

Figure 2: The output of the TestingServlet